
This summer is all about kicking back and having fun – creating crazy fun looks with warm sweeps of color! And what better way to capture the beautiful warmth of summer than with soft pink eyeshadow and a glossy pink pout?
Add a rosy-pink flush and your olive complexion will be positively glowing!
Light and natural, this beautiful look captures the essence of summer perfectly. It’s seriously one of my favorite go-to looks for daytime! And I’m going to show you how to recreate this look yourself.
Are you ready? Let’s get to it.
- Soft Pink Makeup Tutorial Checklist
- Step 1 – Smooth on BB Cream
- Step 2 – Back to the Basics
- Step 3 – Add Your Shimmery Base
- Step 4 – Color Your Eyes Pink
- Step 5 – Deepen the Depth
- Step 6 – Splash into Tangerine
- Step 7 – Line Them Up!
- Step 8 – Darken Your Lashes
- Step 9 – Bring on the Bronze
- Step 10 – Dip into Blush
- Step 11 – Illuminate Your Summer
- Step 12 – Sink into Strawberry
Get Wild with Pink: Rosy-Tinted Makeup for Daytime
I love rocking vivid colors and wild looks I usually wouldn’t wear any other time of year. And guess what? Bright rosy lips and soft pink eyeshadow are trending big this summer!
It’s no wonder either. Nudes, pinks, and berry tones just give off natural warmth that’s absolutely stunning to rock! Seriously, neutral pink makeup looks so flattering on olive complexions. Even better with your golden tan!
But don’t just take my word for it. Try it yourself!
For this soft pink makeup tutorial, we’re going to focus on our eyes and lips.
To prepare you for the scorching hot days ahead, I’m pairing a gorgeous budge-resistant, strawberry-tinted lipstick with this soft pink shimmering eyeshadow. Combined, this warm cherry blossom color scheme will have you radiating a gorgeous pinky-warm summer glow in no time!
You can wear this beautiful look during the day. Or spice it up for those steamy late nights with these dramatic fluttering lashes – you decide! Whether you’re on a hot library date or picnicking outdoors, you can’t go wrong with this soft pink makeup tutorial.
So get out your pretty rose-toned shadows! We’re getting wild with pink.
Grab the Summer Look: A Soft Pink Makeup Tutorial
This super feminine soft pink makeup tutorial was inspired by the beautiful warm colors of the season – lovely muted pinks that scream, “girls just wanna have fun!”
And to really kick off the party, we’re featuring flushed, highlighted eyes paired with deliciously bright berry lip tones. Plus, this soft pink makeup tutorial is super easy to create yourself!
But since summer can get pretty smokin’ hot, we’re keeping this makeup look light for sweaty weather. Because, girl – ain’t nobody got time for clogged pores (say it with me)!
So if you’re ready to try your hand at this simple yet stunning summer makeup look, go ahead and grab that makeup brush. Let’s create our masterpiece!
Soft Pink Makeup Tutorial Checklist
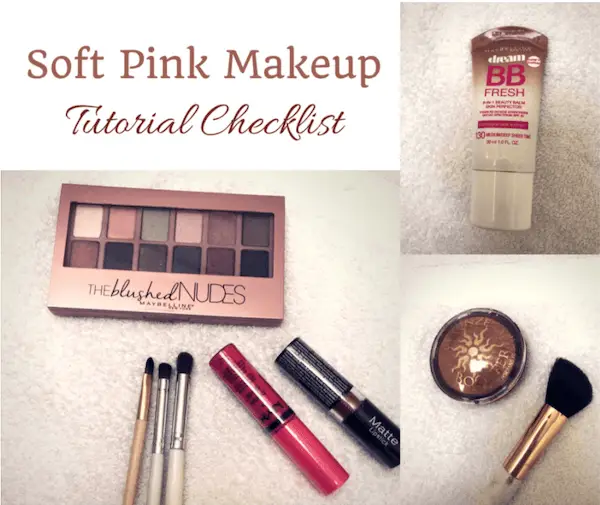
Eye Makeup
Lip Colors
Face Products
- Maybelline Hydrating BB Cream Skin Perfector
- e.l.f. Beautifully Bare Liquid Highlighter
- Maybelline Face Studio Master in Molten Rose Gold
- Physicians Formula Bronze Booster in Shade Medium to Dark
Makeup Brushes
- e.l.f. Eye Crease Brush
- e.l.f. Blending Eye Brush
- e.l.f. Angled Eyeliner Brush
- e.l.f. Ultimate Blending Brush
Step 1 – Smooth on BB Cream
First and foremost, let’s set a base for all our makeup.
Here, I’m going to use my favorite BB Cream by Maybelline (Dream Fresh Skin Perfector in shade Medium Deep) – perfect for summer!
The consistency is thicker than many tinted moisturizers (it’s a BB cream, after all). But this little BB cream still gives beautifully sheer coverage lighter than most foundations.
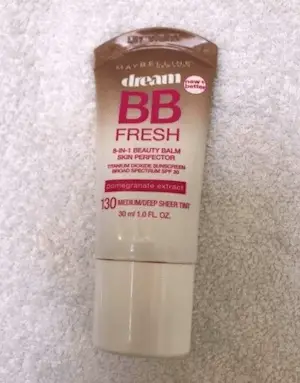

With a buildable oil-free formula and broad-spectrum SPF 30, you can keep acne in check while staying protected from the harsh sun. How great is that?
And we’re going to cover our whole focal area with BB cream!
Apply a smooth even layer all over your face. You can use your favorite makeup sponge for this or blend the formula in with your fingertips. This super sheer BB cream will keep you looking natural and fresh for summer – without weighing down your skin or causing breakouts!
All set? Move to the next step in the soft pink makeup tutorial. Let’s start prepping our eyes!
Step 2 – Back to the Basics
Before we move forward, prime your eyes!
Eye primer doesn’t just increase the lasting power of eyeshadow (and stops it from fading or settling into the crease). It also helps all those pretty pink pigments stand out. This will be especially important in a second – when we dig into our Blushed Nudes Palette by Maybelline.
I love the Eyeliner Sealer by e.l.f. for this look. Not only does it help seal your eyeshadow in place, but you can even create your own eyeliners with the opposite end!
You’ll see how this works later in this soft pink makeup tutorial. But for now, gently glide eye primer across your eyelids, working the formula into the crease and up to your brow.
When you’re ready, move to the next step.
Step 3 – Add Your Shimmery Base
Moving on to our eyes, let’s lay down our base color! Girl, you know the drill.
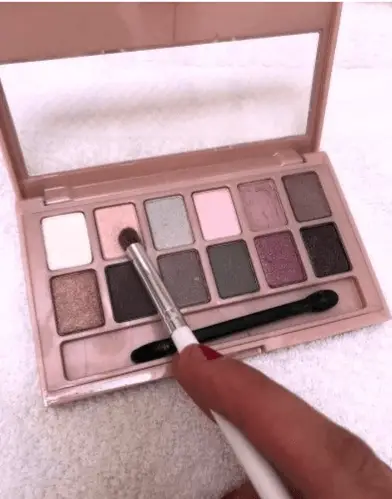
Whip out your Maybelline Blushed Nudes Palette and pick up that beautiful sparkling white – first eyeshadow on the top right of the palette.
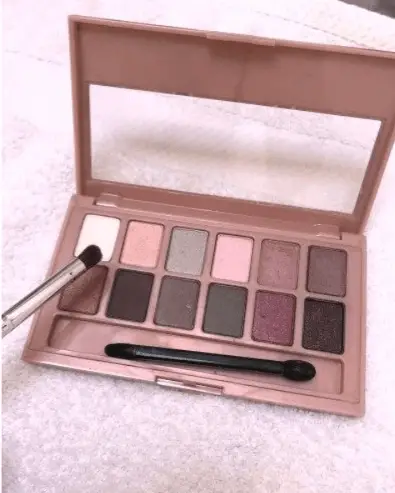
This pretty white shade doesn’t just prep our eyes for all that rosy color we’re going to add in a minute. The shimmery texture also brightens the eyes, making you look awake and ready to start your summer day! And it’ll also help create a beautiful transition of color from light to dark hues, adding more dimension and highlight to those gorgeous lids.
I’m going to use my trusty e.l.f. Blending Eye Brush here to cover the entire eyelid with shimmering white. This is my favorite brush for packing on the shadow – the bristles are just super soft and dense!
Gently sweep the color into the crease, blending it out into your skin with soft windshield-wiper motions. Once you’re done with that, get ready for the next step in this soft pink makeup tutorial!
Step 4 – Color Your Eyes Pink
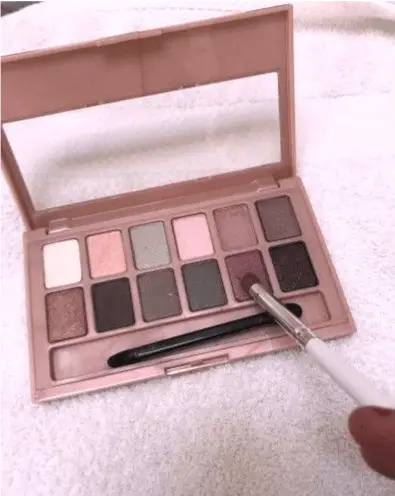
For our first pink-tinted shade, select the soft rose-petal color in the Maybelline Blushed Nudes Palette – second eyeshadow directly next to the shimmering white shade you used in the last step.
This beautiful soft pink eyeshadow adds a touch of sparkly pizazz for an instant glow!
With the same Blending Eye Brush you used in the last step, pick up some pigment and tap off the excess. Add this pretty muted pink color to the crease of your eye, gently blending with circular motions into that gorgeous shimmery white we added earlier.
You should see a soft color transition as you drag the pigment closer towards your brow bone. Notice the subtle blushed glow this color gives your eyes?
We want your eyes to radiate a natural pinky-blushed look that spreads out and really captures the gaze. And this color is soft enough to create a realistic look that looks natural during the day!
Step 5 – Deepen the Depth
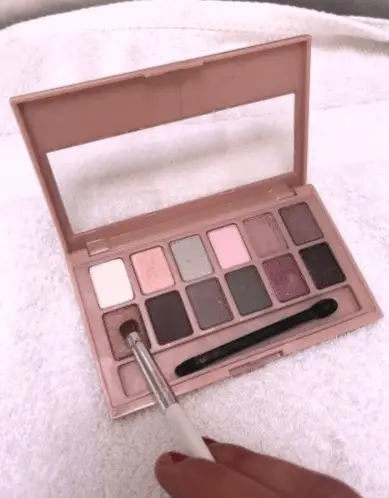
It’s time for my favorite pink eyeshadow in the whole Blushed Nudes Palette – a gorgeous deeper pink that just screams party!
Taking your e.l.f. Blending Eye Brush, pick up the second eyeshadow on the far bottom right of the palette. This color stands out so beautifully on olive complexions, creating stunning looks for both your late summer nights and hot early mornings! It’ll even give your makeup a dash of fun personality.
Pat pink pigment into the crease, spreading the color towards your outer corners with windshield-wiper movements. Create a soft transition of color just like you did in the last step. This will give our eyes more depth!
When you’re ready, move to the next step.
Step 6 – Splash into Tangerine
Now let’s warm up our look for summer.
Next, you need to grab your e.l.f. Eye Crease Brush. You’re going to get tons of control with this bad boy! The small domed-shaped bristles allow complete precision. So you can sweep on pigment exactly where you need it without going overboard – so important during the day!

You certainly don’t want lots of pigmented color detracting from your look, do you?
- Dip your brush into that lovely warm tangerine eyeshadow on the far bottom left of the Maybelline Blushed Nudes Palette. I absolutely adore this color! It just reminds me of juicy ripe fruit on a hot summer day. Plus, it totally adds that summertime picnic feel to our look!
- With your e.l.f. Eye Crease Brush in hand, blend this color into your crease with short circular motions. For even more definition, spread delicious pigment towards the outer corners of your eyes. Your eyes should now be taking on a subtle peachy hue.
We’re almost done with the soft pink makeup tutorial. But before we swipe on mascara, let’s line our eyes with this same tangerine eyeshadow!
Step 7 – Line Them Up!
It’s time to take out the e.l.f. Angled Eyeliner Brush! This angled shape lets you apply concentrated eyeliner super close to the lash line.
After all, we want this soft pink makeup to look as natural as possible. The e.l.f. Angled Eyeliner Brush is perfect for this!
- Get your e.l.f. Eyeliner Sealer ready. This handy little tool turns any powder eyeshadow into a waterproof, liquid liner! How cool is that?
- Find the eyeliner side of your e.l.f. Eye Primer and Liner Sealer and swirl the applicator into the same tangerine color we applied in the last step.
- Taking your Angled Eyeliner Brush, rub a bit of pigment onto the pointed tip. Now draw a thin line against your upper lashes. Follow suit with your lower lash line.
See the gorgeous outline this tangerine color is creating? When you’re done, move to step 8.
Step 8 – Darken Your Lashes
Our eyes are all done, but don’t forget your lashes!
Here, we’re going to apply Too Faced Better than Sex Mascara (oh honey, it is!). This amazing wand will keep those lashes fluttering with even more length and volume. And because the lash formula is so long-lasting (and waterproof!), you can rock beautiful lashes all day long. Even at the beach!
So grab your Better than Sex Mascara and let’s get to it!


Go ahead and apply a thin coat on both your upper and lower lashes. We want them to look naturally long and defined for the day. And I’ve seriously never met a better mascara to get the job done than this one! It’s perfect for giving lashes a butterfly flutter effect every time you bat those babies.
Have a clumpy formula? Just comb out your lashes with your trusty lash brush.
All set? Let’s heat things up with bronzer. Move on to the next step in this soft pink makeup tutorial!
Step 9 – Bring on the Bronze
Now let’s move back to our face.
For this soft pink makeup tutorial, we’re going to bring in the warmth and get our olive complexion positively glowing for daytime.
So get out your Physicians Formula Bronze Booster (gosh, this little thing is gorgeous, isn’t it?). We’re going to apply shade Medium to Dark – the perfect complement to bronzed olive skin!
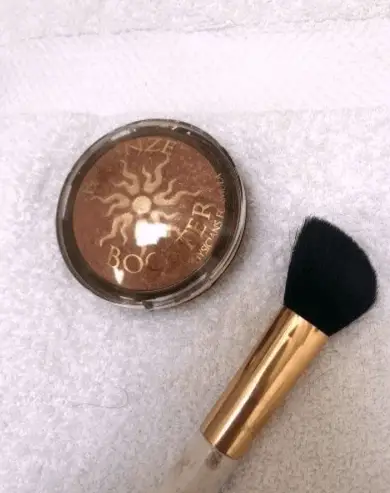

- With your Angled Blush Brush by e.l.f., pick up some of that gorgeous bronzing powder. This brush has such soft bristles that pick up a lot of pigment, so tap off any excess powder before you begin!
- Glide soft pigment from your hairline to just under your cheekbones. This will create our contour.
- For a natural warm glow, also place pigment around the outline of your face. Stay as close to your hairline as possible!
When you’re done, you should notice a very subtle contour around the outer parts of your face. Feeling that sun-kissed look yet?
Step 10 – Dip into Blush
Let’s give your face a beautiful rosy flush.
For this, we’re going to use the Maybelline Master Hi-Light Blush. This medium rose blush looks so soft and natural (and isn’t summer all about that healthy light flush?).
Taking your e.l.f. Angled Blush Brush again, pat the Master Hi-Light Blush on the apples of your cheeks. Ever so subtly, sweep pigment up towards your hairline and let the color naturally blend into that bronzed contour we added in the last step.
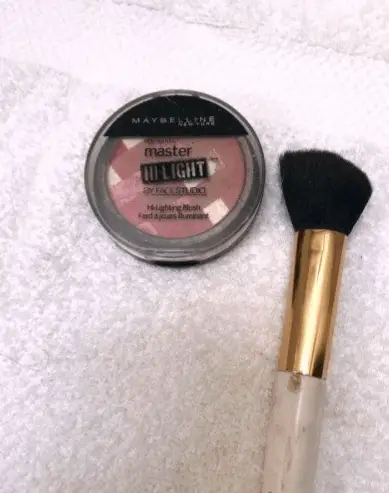
This will create a very natural-looking rosy flush that looks super flattering for summer! It also complements this soft pink makeup tutorial so nicely. But don’t stop there!
Jet on over to the next step – we’re intensifying the glow!
Step 11 – Illuminate Your Summer
Time for my favorite part – grab your e.l.f. Beautifully Bare Liquid Highlighter! This amazing highlighter gives bronzed olive complexions a lovely sheer glow that looks so radiant under the summer sun.
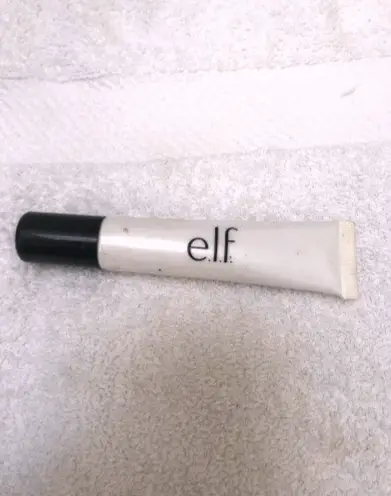

- For the smoothest most even application, shake the tube up really good! This will mix the formula, so it doesn’t feel watery or greasy on your face.
- Decide which features you want to stand out and illuminate these areas. Apply your highlighter here – on your cheekbones, the tip of your nose, even under your brow or on your Cupid’s bow.
This gorgeous highlighter “brings forward” any place you put it for a nice soft dewy finish. And a little goes a long way! You really don’t want this to appear heavy – it’s a day look after all!
All set? We’re not done yet! Let’s get those lips looking lush.
Step 12 – Sink into Strawberry
Finally, moving on to the lips!
For this soft pink makeup tutorial to really take off, we’re going to get that beautiful NYX Matte Lipstick ready.
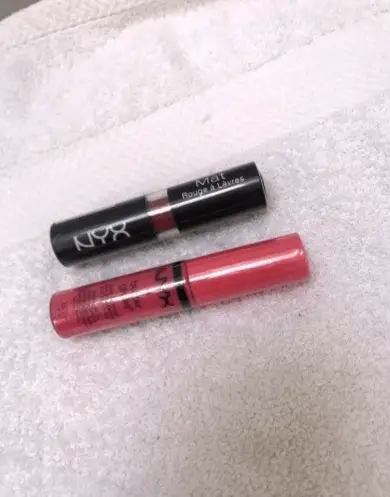
- Go ahead and glide this gorgeous pink color onto your lips. I chose Strawberry Daiquiri, a lovely salmon pink that looks so stunning with our flushed pink-inspired eyeshadow. But the best part? This NYX Matte Lipstick feels surprisingly comfortable in the summer heat – it won’t even dry out your lips!
- Now grab your NYX Butter Gloss in Creme Brulee. We’re going to apply this all over our lips as well! This gorgeously sheer glossy texture isn’t sticky at all and matches our dewy face makeup beautifully. Plus, the NYX Butter Gloss leaves lips feeling super moisturized and smooth for summer!
Combined, everything comes together to create a natural sun-kissed glow that keeps us looking sun-ready.
You’re finished! Pucker up. 🙂
Final Thoughts
If you want to increase lasting power even more? Then try spritzing your face with this makeup setting spray. It’ll help your gorgeous makeup last all day (seriously) – keeping those beautiful colors right where you left them!
So there you have it – a simple guide on how to get that natural pink makeup look for summer.
